
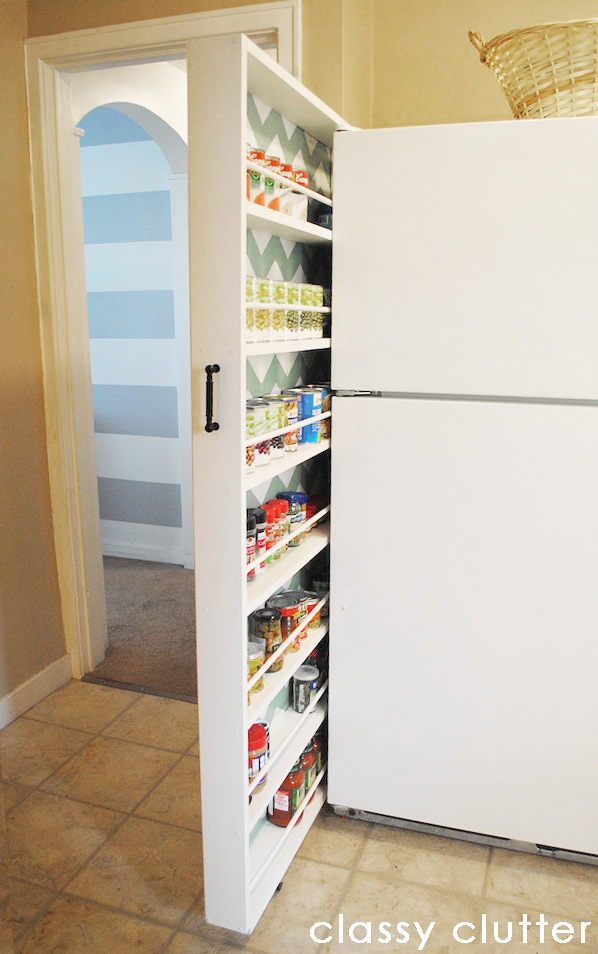
DIY Canned Food Organizer Tutorial
I built this DIY Canned Food Organizer and it’s basically changed my life. Let’s start by saying, have you see my little kitchen?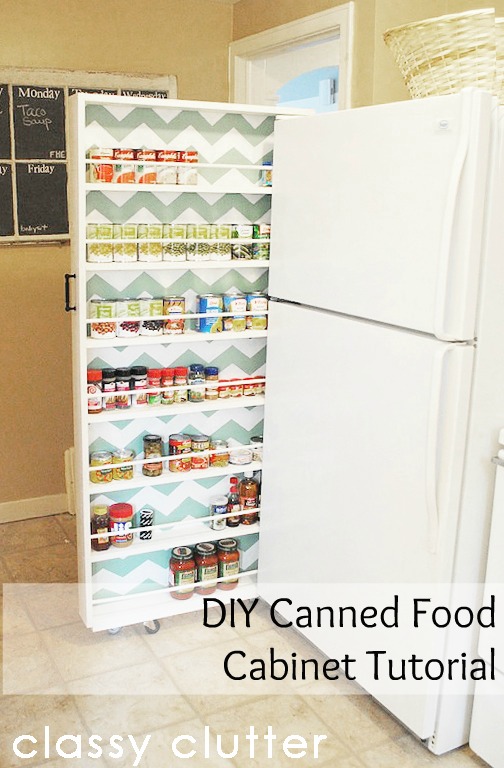

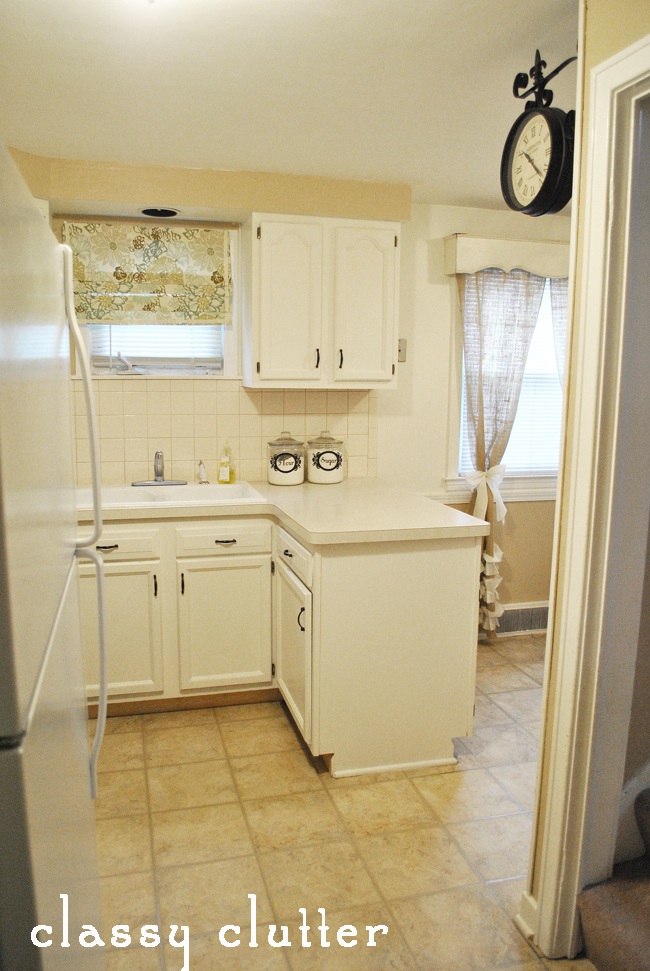
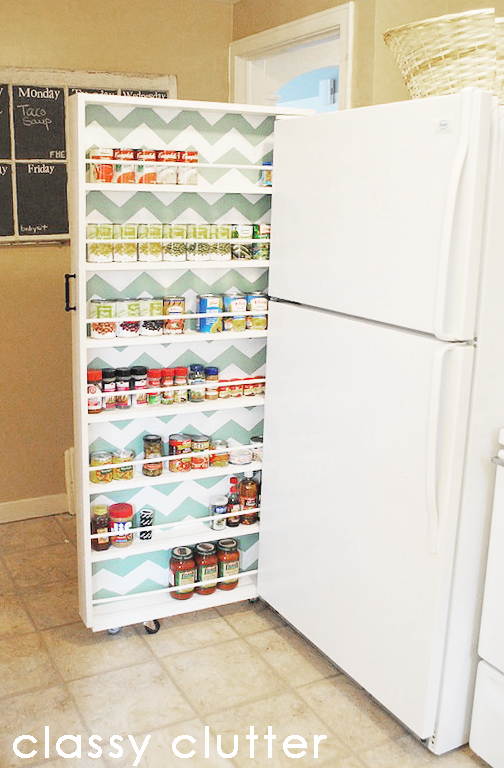
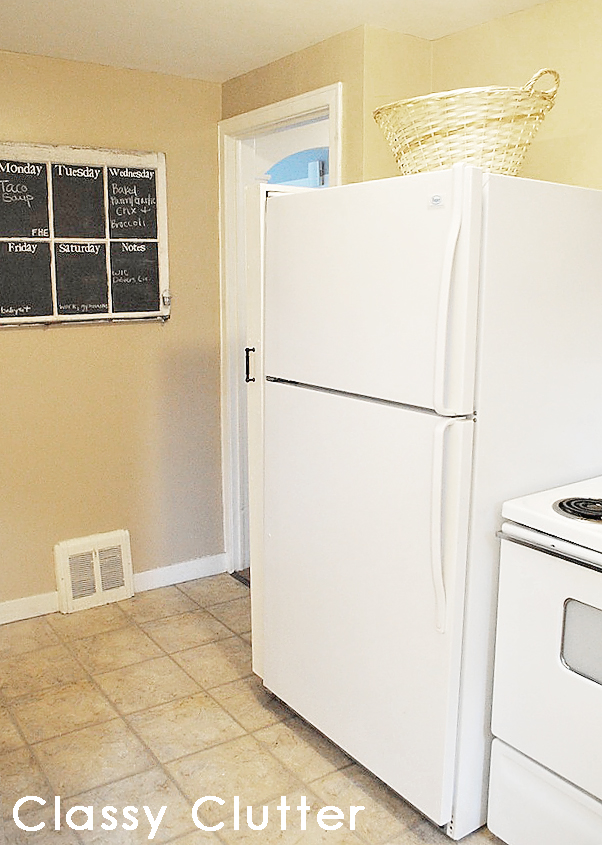
It’s totally tiny but does a fine job suiting our needs…mostly… One problem I’ve run into with a small space is storage space. I’ve had to get a little creative and maximize the empty space hiding in the room since we’re lacking a pantry. However, our kitchen had about a 6″ opening between our wall and the refrigerator. Which btw, I didn’t even notice until I saw this pin on pinterest and knew I needed my own version stat! This idea blew me out of the water! It will solve all of the world’s problems!! Or at least my kitchen space dilemma! *wink*
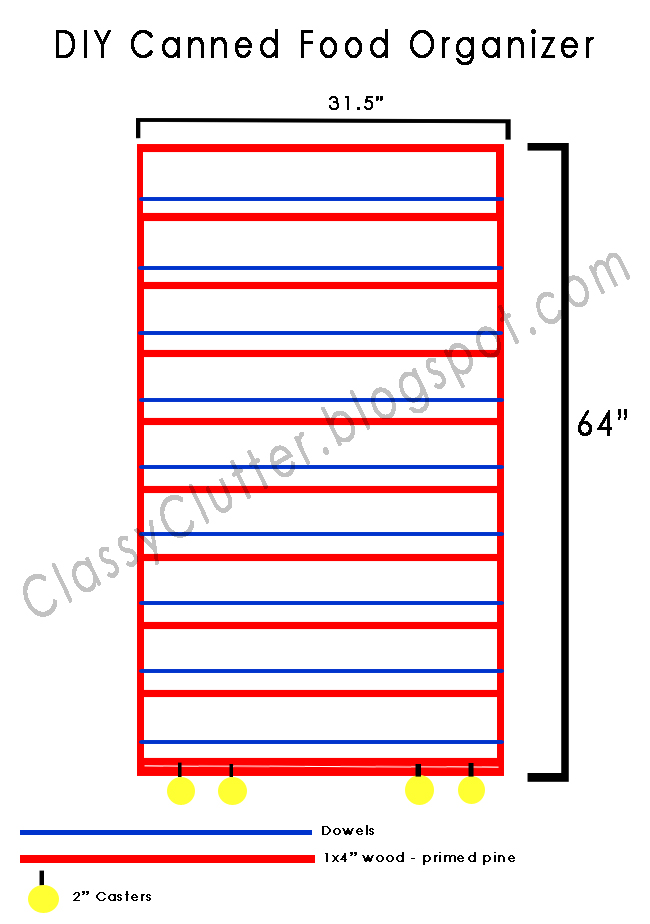
**NOTE** There are too many shelves on this plan. I ended up only doing 7 shelves total opposed to the 9 on the plan. My measurements and “shopping list” will include supplies for 7 shelves so just pretend those other 2 aren’t there in the plan above. 😉
DIY Canned Food Organizer
Shopping list:
9 – 1×4″ boards cut to 29 1/2″ (top board, shelves, bottom board)
2 – 1×4″ boards cut to 64″ (Side boards)
1 – Thin board cut to 31 1/2 x 64″ (I used bead board/wainscoting board from Home Depot)
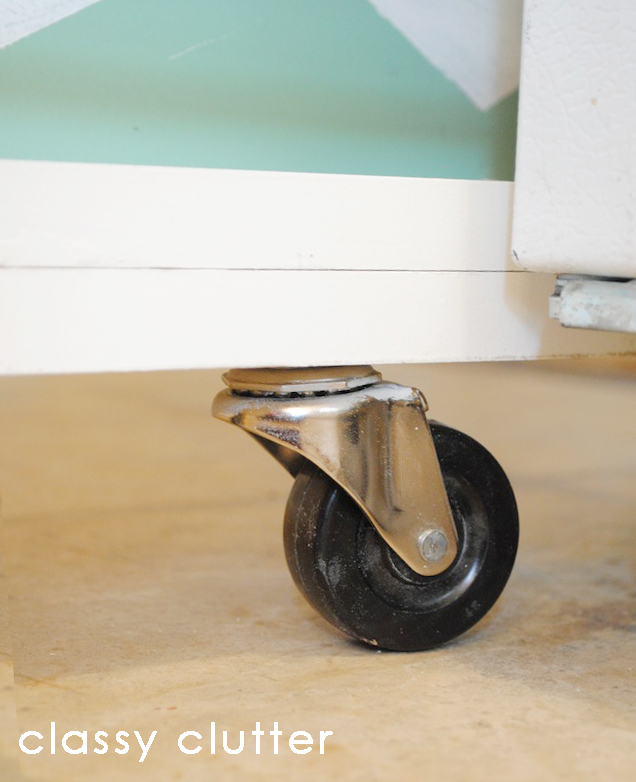
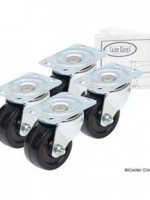
4 – 1 1/2 – 2″ Metal Casters that hold 50+ lbs (I used 2″, 80lb)
7 – 7/16 dowels cut to 30″ long (lumber section of Home Depot)
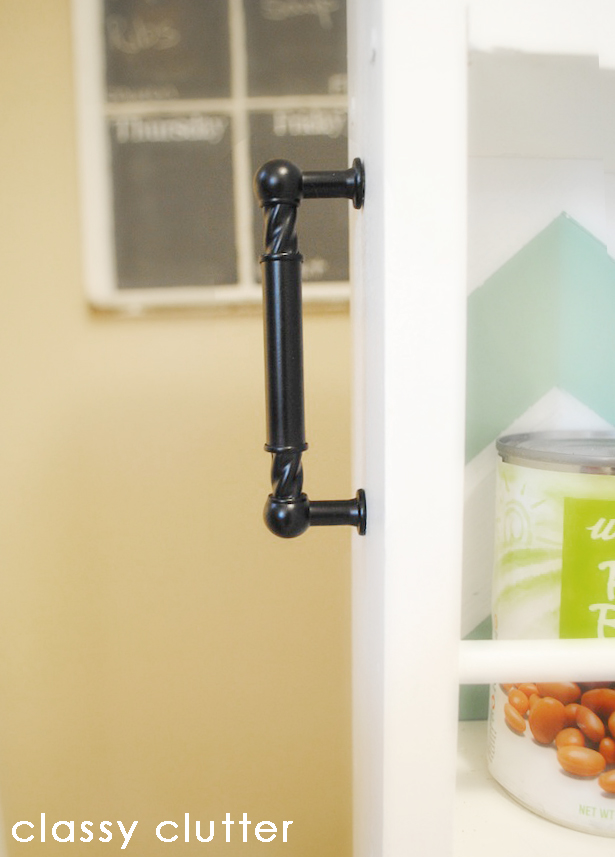
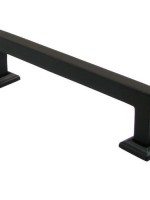
Handle or knob
Paint and Brush, Roller or Sprayer (if needed)
Tools and Supplies:
Drill
7/16″ drill bit for drilling dowel holes
several wood screws
several 2″ nails
several finishing nails
hammer
(I also used my jig saw to make some cuts that weren’t precise – you may not need to do this)
Directions:
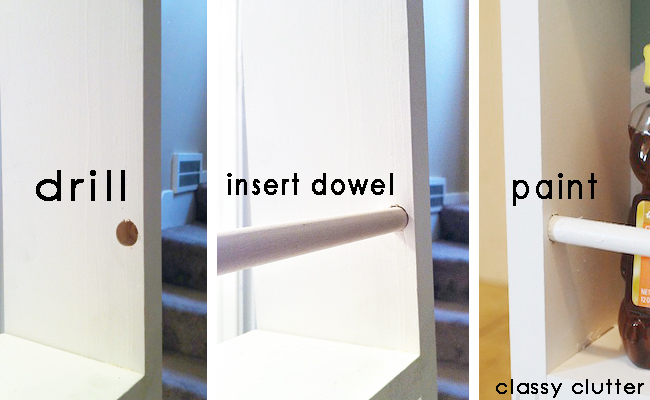
1. Build the “ladder” by screwing and/or nailing all boards together to make the main structure (shown in red on my diagram. Note that you will screw two of the 1×4″ boards together at the base. I’ll show you why later. Tip: I used screws for the outside frame but found that nails worked best on the shelves. I used 2 on each side of each shelf.

2. Drill holes for dowels – Mine are about 1 1/2 ” from the bottom of the shelf and about a 1/4″ from the outside. I used a 7/16″ drill bit because that was the size of the dowels I chose.
3. Insert dowels into holes. Use wood glue for extra support. I may or may have not used hot glue. 😉
4. Next, if you want, paint a design or a pop of color on the inside of the cabinet. No one will see this unless it’s open so I wanted to do something fun. I mixed up some Oops! paints I had lying around and got this pretty blue/green color that matches some of my kitchen decor. You can totally just do it to match the outside and skip this step for now. As you can see, I chose a chevron design.
5. Use finishing nails to attach your back board. I placed nails on the outside perimeter and nails where the shelves were so it didn’t “bow” out the back if cans got shoved back there.
6. Fill any holes or cracks with paintable caulk or wood filler.
7. Paint! I used my HVLP spray gun and air compressor to paint mine and it went super fast. You could hand paint it or even spray paint it if you want!
8. Attach casters according to the package directions. Because my screws that attached to the casters were longer than 1″, I added that extra bottom 1×4″ board to have something more substantial to drill into when attaching the casters.
9. Attach your handle or knob to the front. I found that a handle (drawer pull) worked well to pull the cabinet in and out.
10. Fill it with your canned goods, spices, or whatever and that’s it!
**Updated to answer some FAQs:**
- No. This is NOT a free-standing cabinet. It is fully supported by the wall on the left side and the refrigerator on the right side. If it is pulled out too far, it could potentially fall. I built it over a year ago and have not had any issues with it at all but I suppose it could happen. You could install a stopper on the floor or locking casters to prevent an accident.
- My refrigerator does not heat up on the sides and over the past year, I have had absolutely no issues with food spoiling from any heat. The fridge is completely cool to the touch.
- The total was around $110 to build it. For all materials.
I have had a ton of inquiries about it and honestly, it’s one of the BEST projects I have done. It saves us SO much room and is basically life changing.
What do you guys think?! Isn’t this cool?? Is it weird that I love it so much? 🙂 It has made a world of difference in my kitchen and I’m ecstatic!


It’s lovely, creative, and a great use of otherwise useless space, but is it a good idea to keep canned foods on the side of the refridgerator where it gets hot? Maybe yours doesn’t do it, but the sides and back of my fridge are usually rather warm.
I actually opted for the left side of the fridge to avoid this problem with the stove but my fridge doesn’t get hot at all. It actually stays quite cool! Thanks for stopping by!
I Love this, Can’t wait to do it ….I just have 1 question.. how do you keep it from tipping over I don’t have anything on either side of my fridge no wall nothing…???? Please let me know….thanks..
Okay, alter with a wider base and a small weight bolted on to keep it from tipping.
Basically you use more on the side not along the fridge or you make a lip at the same level as the underside of the fridge to brace against it.
Obviously this only works where there is a space with support on either side, which would otherwise be wasted.
Go to local hardware store and I used 3-draw slides, make sure to get long enough to open all the way .
Maybe install four to six wheels, instead of just two. The support will be equal on all sides.
Great idea!
Dear Classy Clutter, I bought some 1×4 utility wood, but when I went to put it all together, I noticed the wood was slightly warped and would not square and go together properly. Do you know if there is anything I can do to straighten the wood, or do I just need to buy new wood? Also, the 1×4’s were not actually 1×4, they were 3/4 x 3.5″. I was told when I bought the wood that that was normal. The 2″ casters would not work with 3.5″ wood. Also swivel casters did not seem to work at all for me. (Above instructions just said “casters”. ) I went back and got rigid casters which seem much better. (This is my first real wood project and I am looking forward to finishing it.) Thank you for any help you can give me.
Dear Classy Clutter, I went back and bought a better grade of wood (for the 2 side pieces), which was straighter and managed to get it all together. Additional notes: Since the 2″ rigid casters would not work for me with the 3.5″ board, I used a slightly wider bottom board and then screwed the 2 bottom boards together. Also, if I had drilled holes and used dowels, I don’t think my vegetable cans would have easily fit onto the shelves, so instead, I nailed “slats” on the outside of the frame (where the dowels would have been). I guess I just have to be careful that the cans don’t fall forward and push the slat off. I also plan on using the “fuzzy” small furniture protectors around the bottom and top, so that the unit won’t scratch either my wall or my frig when it slides in and out. It really adds to my kitchen storage – my kitchen is very small too.
I want to build this tomorrow. What a clever design. What wood did you use for everything? You mentioned beadboard in for some part of it. Help! Please.:)i want to see.
please email us at classyclutter4@gmail.com for help! Thanks xo
Great idea!! My husband is making one of these for me right now…any “upgrades” or suggestions since you first made it?
I want to build this tomorrow. What a clever design. What wood did you use for everything? You mentioned beadboard in for some part of it. Help! Please.:)
Then it’s perfect 🙂 I really like the zigzag you put on the back panel. Your whole house is coming up beautiful.
This is pure genius! I absolutely love it! So would this be a problem to the right of my fridge??
Please add my name to your email list. Love the narrow roller storage unit. Building one for my daughter in their 1st home.
Hi. Do you think that this would work next to a built in stove?
I was wondering the same thing. My concern would be the heat from the stove… I was thinking that the bottom portion could possibly be used for storage of cookie sheets and other things that heat wouldn’t bother. the portion from the top of the stove to the ceiling (or top of the fridge) is where I was thinking I could store spices for quick access.
Do you think that would work and not destroy your spices?
Yes, I think that would totally work!
Spices shouldn’t be exposed to heat or humidity. I’m building mine for space between washer & dryer in laundry room. I may move w & d together and put skinny storage between washer and wall. If I do that, I will add narrow shelf on wall just above skinny storage to keep it from coming out too far or tipping.
Pure genious! Way to maximize the space in your adorable kitchen.
Thanks Hilary!! 🙂
Mallory @ CC
This is amazing! I wish I was skilled enough to build it! It’s so pretty…
That’s the great thing about this project…anyone can! Just take your time!
..
True im 67years old and im building it myself. love it.
luv
True im 67 years old and im building it myself. love it.
Wow! What a great idea! I’m always seeing those fancy pull out segments at Ikea and I’m totally jealous. I never thought of making one myself! I wouldn’t have room by the fridge, but we’re planning a move so maybe in the next house! Again- great job! I’d love for you to share on Sweet Sharing Monday! http://saynotsweetanne.com/2012/sweet-sharing-monday-3/
Super creative – it is practical and pretty – my favorite combination!
Beautiful post and blog!:) Would you like to follow each other?
This is better than the one I saw on pinterest. Amazing work! I bet the people you rent from LOOOOVE you guys!!!
Way to go Mallory!! This is seriously genius! You are amazing!!!
Seriously love this Mal!!!! It looks so good! Love the chevron.
You’re the best! Couldn’t have done it without you!
Mal
Super Cute. & Clever. Bythewayjenngray.blogspot.com
I LOVE this!!! I need to go check my fridge now & see if it’ll work for our space…. Thanks!!! 🙂
Love it!
It’s such a great idea and such a space saver.
It’s amazing! Totally not weird that you love it so much, if I had one I would be drooling all over it (metaphorically of course) 🙂 It’s looks fabulous, and I love that you added the chevron to the inside. I want one! Now I just need to find a few spare inches somewhere in our kitchen!
Brilliant! I’m soo pinning this! 🙂 You hooked me with this post! I’m a new follower! I’ll be looking forward to seeing more posts! 🙂
Brilliant! I pinned it and I’m going to email it to my husband. We need this so badly! Thanks for the clear tutorial too! I just love it!
What a great idea – and so wonderfully executed, too!
I would love it if you would link up at Watch Out, Martha!’s first link up party: Martha Mondays on May 7th! Hope to see you there! (www.watchoutmartha.net )
Saw you on Whatever Goes Wednesdays, and this is amazing ! You did a great job ! I have a small kitchen and would love something like this, but I plan on gutting the kitchen. However, I think this would we a cute little idea for the bathroom… Good job on your chevron stripes, too. Thanks for sharing !!
I just saw that your amazing airplane valance was featured on House of Hepworth’s this week!! WAY TO GO!!!!! 🙂
I love this and it’s a feature this week!
http://daysofchalkandchocolate.blogspot.com/2012/05/features.html
We need one of these, what a great idea!!
Neat idea, but the civil engineer in me wants to know how this could possibly be safe?! I see it toppling over as soon as my preschooler pulls it out far enough to no longer be sandwiched between the wall and fridge. Can you explain how you keep it stable? Thanks.
KF – Thanks for your question. Several measures have been taken to make sure this was as safe as possible for kids to be around. The wall on the opposite side of the fridge provides a lot of support. Also, the (4) casters have been placed to provide support and it actually stands up on its own when pulled out too far. The most important thing we did for safety is putting the handle high above the reach of my children. They cannot, even if they tried, pull the cabinet out at all. They also have shown zero interest in the cabinet which helps a bunch. I can assure you that my kids are perfectly safe regarding the cabinet as they cannot move it at all. Thanks!
I am making one and while I don’t have kids in the house, I was going to put a chain or cord attached to the fridge or wall that would prevent it from being pulled out too far. add one top and bottom and it should not be an issue at all.
BTW: thanks for the great tutorial on this. I love it, I will let you know how it goes next month when I make it :D.
Great idea with the cord/chain attached behind it to prevent it from being pulled out too far.
I love this shelf and since we are in a VERY small apartment compared to the house we moved out of recently this is perfect.
Just a thought…To avoid the possibility of pulling it out so far that it has no support, why not install a metal door stop or something else that could A) stick out of the supporting wall, B) be small enough that it wouldn’t get in the way if placed properly (i.e. where it would slide just under one of the shelves, and C) would be string enough to offer a little resistance if the shelves were pulled out far enough for it to hit the end…?
I am building one right now, It is super easy to add a stop on it so it cannot be pulled out completely.
What support are you talking about? You don’t mention anything about the opposite side.
This is awesome for “stepsaver” (read: tiny as heck) kitchens like mine! How did you place the casters to stop it from rubbing on the wall? I’m in an apartment and don’t want to have too many scratches to fix when it’s time to move out.
I bet you could use a drawer slide attached to the wall and the back of your homemade cabinet. This would keep it from being pulled out to far as well as help it roll smooth.
Really good idea, thanks! I had thought of attaching a length of chain from the back to the wall as a stop, but your idea would keep it from rubbing on the wall or fridge as it goes in and out. Will be looking into doing this for my small kitchen.
I love this! How very creative. :o)
I do have one question. Do the things stored in it get very hot? My fridge & upright freezer both put off some heat & the sides are warm to touch. Do you notice this with your food you store here?
Be still my heart! Love love love it! Thanks for the great tutorial.
Brilliant! I never came across anyone in blogland with a kitchen as small as mine. Actually, I think you have more cabinets than I do, if you can believe that. Two doorways and a dining room opening further contribute to my space challenged kitchen so, like you, I can benefit from one of these. Thanks so much for sharing this great storage expansion idea. Heading over to Learning to Be Me (your inspiration for this project) to give thanks as well.
Really great storage solution! I am also pantry-less and always on the look-out for more storage space ideas. Thanks for sharing!
What a great idea! I like the way you incorporated design into the back.
its so pretty. i would want to keep it out all the time.
Very nice idea, and workmanship. Does the fridge door open OK with that there? I have a side-by-side, and wondered if it would work OK for mine. Thanks so much for sharing – I have to try this now, as soon as I get the lumber rounded up!
This is exactly what I need! I’m super excited!! Thank you thank you for the instructions for how to make it. I was just wondering if you have any problems with it scratching the side of your fridge. I didn’t know if pulling it in and out would end up making places where it rubbed.
I would love to try this in our new home because it is a TINY kitchen! The only problem is there is no wall or anything on the side of our fridge, and it is next to our stove… I also have little ones so I wouldnt want to leave it out in danger of it tumping over
This is ingenious! Seriously hats off to you, this is the smartest use of wasted space that I’ve ever seen! I FBed it and Pinned it, thank you so much for sharing at the Weekend Warrior!
Anna
http://www.askannamoseley.com
GREAT idea!! LOVE it!
Oh WOW! this is brilliant! It is so simple and so effective. It amazes me that no one seems to have come up with such a great way to store such items before now. Such ingenious thinking on your part.
thanks for making it and sharing it. I am going to pin this so that I can show hubby and inspire him to assist me (mostly do it for me) to adapt and make one for our kitchen. The timing couldn’t be better as we are in the process of re-thinking our kitchen space. I will blog it when I get to it and link back to your blog too.
YOU ARE AMAZING!! Thanks for sharing this!
And I thought I was weird for hugging my kitchen countertops! What a fabulous idea! So fabulous that I was compelled to pin and FB it too …
🙂
Linda
What a great use of space! love it…
Thats a brilliant idea!! Now Im wondering how I (read husband) can make something similar in our tiny kitchen…I dont have a perfect spot like u. But ill store this idea in my memory couse its a great idea! Only after reading todays post did I realize u r actually renting a place, Im amazed at what u have done to it! we r also renting but lets just say I wont be having a tour of our flat any time soon;) Thanks for posting! From Anita in Norway
What a fantastic idea…and it’s so pretty! It creates so much more usable space! I love your striped wall in the background too!
I would love if you would post it and share it with my readers! Join the Community and share any of your creative project!
Susan @ Oh My! Creative
Instead of drilling right through, you can use a forstner bit and only go halfway, and then just have a fixed top and bottom, with finished edges.
I *LOVE* this!!! My husband and I live outside NYC right now but will be moving into Manhattan next year when our lease is up. We’ve “window shopped” for apartments and it’s hit or miss when it comes to any sort of storage. But 6″ next to a fridge? That’s a little more doable. Great idea!!
This is great! I love the pop of color on the inside.
A friend got one of these when she remodeled her kitchen and I figured I would have to wait quite awhile to get one for my own. It never occured to me to build one. Thanks so much for the info. 🙂
This is SOooooooooh ingenious. I am going to make one of these for our postage stamp sized kitchen. Thank You for sharing the idea (not to mention all of the measurements and such fab instructions.) You just made my decade!
Just saw this on IHeartOrganizing… this is incredible! Thanks for the great tutorial!
Very cool! Question: Does it get top heavy? What stabilizes it from tipping over if it is pulled out (by a child, I’m thinking!)
Oh my goodness…I am soooo making this!! TFS!
Holy cow we have the exact same kitchen, only my stairs go down not up. Or at least thats what it looked like before I did a little reno (like move the stove to the corner and get rid of that jut out thing and put a dishwasher there – Imagine that and you can guess how much cupboard space I now have). This is such a cool idea. I am totally going to go measure and see if I have enough room to do this.
What a great way to use space and it’s so cute with the chevron stripes.
This is fantastic! My pantry is super tiny- this might be the perfect thing for me!! Pinning it now!
Hey there! Just wanted to let you know we featured you in our Favorite Find Fridays post over at Whimsically Homemade. We used one of your pictures. If that’s a problem let us know and we’ll remove it immediately. Thanks for your great inspiration!
Yowza, that’s SO fantastic! Beautifully done..and I love the added dash of pizzaz with the chevron…you have endless bragging rights with this fabulous project!
Yowza, that’s SO fantastic! Beautifully done..and I love the added dash of pizzaz with the chevron…you have endless bragging rights with this fabulous project!
Yowza, that’s SO fantastic! Beautifully done..and I love the added dash of pizzaz with the chevron…you have endless bragging rights with this fabulous project!
This is such a great idea!! I love it! I need something like this but I don’t think I have enough room in my kitchen. Maybe in my next house!
What a clever idea! Love it!
Thank you so much for linking up to {nifty thrifty sunday} last week! You’ll be featured at tonight’s party! 🙂
XO!
Vanessa @ {nifty thrifty things}
So how do you keep it from being pulled out too far and falling over?
I took out a window to box in a cantilevered pantry and fridge space, so I don’t need this, but I know someone who does. Now I know what to do with the large wheels I rediscovered in the shop the other day. Thanks for taking the time to post this.
You’re not only clever, you’re handy with tools! This is so impressive.
What an awesome idea! Just pinned! Thanks for sharing 🙂
Just built it today for a friend. Pretty simple project but I’m in the business. Check for width. Built with 1×4’s and with the dowels it is pretty skinny for cans. Lots of storage for small space!
How much did it cost to build yourself?
Brilliant 🙂 thanks for sharing this.
This would be great too for oversized platters and lids.
Just wondering approx. how much you spent on the finished product? I want to go ahead and start this but want a ballpark estimate before I go in and have sticker shock! lol!
Hi!
I spent about $110 at Home Depot on all of the supplies I needed. However, that price included 2 drill bits I purchased and I had the paint on hand so it can vary if you have a few items on hand. I’d guess around $100 total… TOTALLY worth it in my opinion as this has changed how my kitchen functions and I love it!! Thanks, Mallory!!
For your boards, you have 1×4″ — that is inches. Do you mean 1×4′ (foot)? Did you really have a foot of space betwen your fridge and wall?
This is such an awesome idea, and I’ve been looking for some extra storage space. I just know I don’t have a foot of space between the fridge and door. Maybe I’m just not understanding it correctly…I’m blonde ;P
Tori, It is 1×4 inches. The boards are 1×4 inch boards used for building. The entire structure that you see when it is pushed in between the wall and fridge is 4″ wide by 64″ tall.
Thanks!
I just built this! Thank you so much for the tutorial! I modified for my space and I added a chain anchored to the wall to prevent the shelf from pulling all the way out and falling on the little one. Here is my pin! =)
http://pinterest.com/pin/136656169913375276/
Yours is adorable! So perfect. I’m really considering building one because i have a fruit box on the bottom shelf of my cabinet/pantry. But I love you made yours short to fit under the counter!
Showed this to the Hubs this morning and he is already headed to Home Depot and Harbor Freight! I will have it in place this later today!
I am totally in love with this idea.. I have already pinned and shared it on my facebook page.. 😀 so excited to have you link up at craftionary..
I’m curious, how much did this project cost you? I know wood can be pricey.
What a great idea! I love how you used such a small space in such an awesome way! LOVE IT!
I saw this too on pintrest! Thanks for the tutorial. Already thinking on how to modify it for my own needs. I just bought a bunch of the spice tins that are so popular now. I was thinking of a magnetic paint or metal plate of some sort on the back just over the cans. That way I can get them off the fridge. So afraid if I close the door to hard they will fall and make a mess.
I have the magnetic spice containers as well and everyone says oh what a cool idea… BUT We are building this and adding them inside.
Maybe I missed this part…however, I’m not sure how you get something that tall and thin to stay balanced? how do you keep it from falling over?
Thanks so much for sharing this! My grandmother used to have something like this in her home years ago, and I was just wondering to myself whether or not I could create something similar for my teeny-tiny kitchen, then BING! Someone pinned this to Pinterest and it caught my eye. I am totally doing this! Thanks for the inspiration! 🙂
I think it should be noted that the boards should be cut to 1×4″ because purchasing precut 1×4″ boards won’t give you enough depth. Those boards are not actually 1×4″ once measured, they are .75×3.5″. We built this using 1×4″ boards and now don’t have enough room for the dowels and the cans…Trying to figure out a better solution. Curt’s post above was correct, using 1×4’s is not gonna work for more normal size cans and larger items. Only smaller soup cans maybe.
Hi Lesli,
I did use 1×4″ pre cut boards and had room for my dowels as well. I have soup cans as well as regular, standard size vegetable cans stored. Are you sure you used the small 7/16th inch dowels? My dowel holes are drilled almost to the very outside edge of the board to allow for enough space. I’m not sure what else could be different as the 1×4″ precut painted pine boards worked perfectly for me.
Thanks so much!
I came across this problem too. I bought pre cut top choice wood from Lowes. They sell it as 1×4 but it measures .75 by 3.5. I found this out after I put on the wheels and it would not stand on it’s own. I was so sad. Since I had about 6 1/2 inches between wall and fridge, I decided to buy a 1×6 pre cut pine(not pre painted) and attach it to the bottom with about 10 screws. Funny because that board actually measured .75 x 5.5! I was lucky I had enough space to solve my issue this way because I had already built the whole thing!
Without the extra 1/2 inch, some of the shelves are a bit snug or too small for regular vegetable cans. But this still suits my needs. I use ttis for cooking wines, different vinegar, cooking oils, and baking goods so everything can be right there for easy access. I had different spacing plans for shelves of course.
One last issue I ran into was the wheels. My floor is tiled with grout spaces that are a bit wide and a pain to clean. So when weighed down with all the food products, the 2 inch wheels where a pain to deal with because they kept turning and catching in the grout spaces. For now I have leftover plywood sitting on the floor underneath, but I feel I may eventually change out the wheels for larger ones that don’t turn.
This was totally incredible!! Thanks so much for posting- I need this asap- well, I needed like a year ago- but asap will work!!
Pinned it!
xo Becca
Clever, clever, CLEVER! Thanks for sharing!
is there a reason for using swivel casters instead of fixed. just thought it would keep the unit in a straight line and stable.
Excellent idea! Making pantry units really a space saver and very affordable.
We just finished this project. Love it but one issue we r having is it leans backward due to the backing. Any suggestions to stabilize?
Thanks for posting this! I’ve been wanting one of these for ever as we have room beside the fridge for one – I’m showing Hubby your tutorial for sure!! Oh, and I’ve Pinned this too, thanks again!
This is what I need to do for my pantry.
It started as a 9 inch deep section. My hubby has deepened it but then we realized the shelves would be WAY too deep for me to reach all the way to the back. So the project has been halted for over 2 years. I wanted something that pulled out but never thought to do several thin ones.
I may modify your design and put dowels on each side so I can get to the shelves from either side.
Thanks!
This is such a great idea. I never seem to have enough space for the cans and spices. Not only is this project functional, it is so cute!
I would love it if you would share this at my new Smart Solutions linky party. You can link up here:
http://theprudentpantryblog.blogspot.com/2012/07/prudent-projects-smart-solutions-linky_13.html
Have a great day!
This is a great idea. I have a space between my washer and dryer that is wasted. Your post gave me the idea of adapting this to store an ironing board with a hanging rod and maybe a folding table. The casters would allow me to roll the unit into the den where I could do my laundry and watch t.v.
I just found your website and bookmarked it in delicious. There is a ton of good information here for me to learn from. Thanks for sharing.
Storage Tents
This works fantasticly for my small kitchen! Now I have room to put away all the junk on my countertop! Everyone who’s seen it has been so impressed!
I’m going to show this to the Mr and we will rework it for canning jars since we rarely by anything in a can. Awesome idea!
How do you make sure it doesnt scratch the wall?
I have the worry, with it being so tall and narrow, that it would tip over. Have you had any issues? I am buying a house with hardly any storage space in the kitchen and no pantry and this would be awesome.
I was wondering the same thing, I wonder if she alternates the wheels on either side to keep it from tipping over? Put still, It seems too skinny to put the wheels far enough apart on each side to keep it from tipping over
Hi!
This is NOT a free standing cabinet. It absolutely will tip over if you do not have it wedged between the wall and the refrigerator. I’m not sure that putting heavier items at the bottom would work but you could certainly try. I have mine wedged in between the wall and fridge and I just slide it in and out when I need something. It is stable until it is pulled out too far. I have not had any problems with it toppling over as I am careful to support it when I slide it out to get an item.
Thanks,
Mallory @ Classy Clutter
Thanks for the clarification, it wasn’t clear from the photos or instructions. I’m thinking that attaching it to the wall somehow would be the best for child safety. I’ll have to figure something out if we do this. Our son is into everything so I wouldn’t want to take the chance.
This got picked up by LifeHacker, and several of the commenters there have suggested using drawer rails for stability and support (the casters still hold the weight), as well as simpler things like stops or tethers to keep it from being pulled out too far to begin with.
Wow! Love this. I’m a new facebook follower. I’d love it if you visited me at OneCreativeMommy.com.
This is fantastic, I really want to have a go when I get to our kitchen. Nice job!
wow! I am already planning this in my head… thinking about what items I have that I could use. I am definitely doing something inspired by this… I will let you know how it goes.
Fantastic idea, every kitchen should have one.
Sue
I love it! So clever.
Brilliant!! Love the color and the whole storage! I will try to make one for our kitchen! Thank you so much!
perth removal
What a great idea! I would love to have some extra space in my pantry.
Jessica @ At Home Take 2
THIS IS AWESOME! One of the houses we’ve been looking at doesn’t have an official pantry.. This is the perfect solution!
Awesome idea!!! AND….noticed the Wegmans cans 🙂 Love Wegmans!! Are you in NY?
It’s worked out very well! Great job on building this pantry.
Saw you sharing at Funky Junk’s SNS
Debbie 🙂
Just made this! Used Brick paneling & it looks super sweet! Thank you for the idea!
Is there a print out version of the tutorial?
Best idea ever! I just looked to see if I have enough room to make one of these and I do not! Darn. That creates so much storage.
It seems tall and that it might be off balance, unless the casters are placed correctly. How are the casters spaced to avoid the problem of the sliding cabinet toppling over? (It is hard to tell by the instructions.)
Hi!
This is NOT a free standing cabinet. It absolutely will tip over if you do not have it wedged between the wall and the refrigerator. I’m not sure that putting heavier items at the bottom would work but you could certainly try. I have mine wedged in between the wall and fridge and I just slide it in and out when I need something. I have not had any problems with it toppling over as I am careful to support it when I slide it out to get an item.
I have spread the casters out to help with stability but DO NOT expect it to stand on it’s own. It is much to tall, thin and heavy for that. I have had no problems with it in our kitchen but it must fit properly in between to supports (a wall, etc) to prevent any toppling over.
Thanks,
Mallory @ Classy Clutter
I have the same question as LAnamas. My hubby and I are wanting to make this, but we are concerned about it falling over, especially with kids. Any thoughts? I suppose if you take care to put heavier items towards the bottom, that would probably help stabilize…
Hi!
This is NOT a free standing cabinet. It absolutely will tip over if you do not have it wedged between the wall and the refrigerator. I’m not sure that putting heavier items at the bottom would work but you could certainly try. I have mine wedged in between the wall and fridge and I just slide it in and out when I need something. I have not had any problems with it toppling over as I am careful to support it when I slide it out to get an item.
Thanks,
Mallory @ Classy Clutter
Update. I wish I would have carefully read through all the comments before my husband constructed this. We bought 1×4’s from Lowe’s which, much to my chagrin, are not actually 1″x4″. My husband and I spent a lot of time arguing today over why YOU could fit spaghetti jars on your shelves with 7/16″ dowel rods, but we could not. 🙂 The reason is the size of the boards.
I love this design, but I would recommend that you make note in the tutorial that not all 1×4’s are created equal. I know you probably didn’t know that when making your pantry, but it would save the rest of us trying to replicate your awesome design a LOT of trouble. 🙂
How much did it cost to make?
Sorry but it’s fairly common knowledge that the posted call outs of boards (2×4, 1×4, etc) are not the actual finished dimensions. “When the board is first rough sawn from the log, it is a true 1×4, but the drying process and planing of the board reduce it to the finished size.”
A soup can is 3 inches. The 1×4 is 3.75. with a 7/16″ dowel placed close to the edge of the 1/4, that leaves 1/4 clearance.
My husband made me one yesterday for my birthday. We actually used precut 1 x 6 boards from Lowes since we have SO MUCH ROOM next to our fridge and it turned out beautifully. Thanks for the great tutorial. We are waiting to paint ours this summer but at least now I have storage!!!
http://gallopinto2.blogspot.com/2012/11/my-birthday-present.html
How much did it cost?
This is fantastic, I really want to have a go when I get to our kitchen.I just looked to see if I have enough room to make one of these and I do not! Nice job!
Moving Boxes NYC
Wow! I will have to try this. I don’t have a closet pantry in my small kitchen, so the cabinet that I use as a pantry is always getting too full. Thanks for the post!
lindo seu espaço 🙂
estou compartilhando aqui
Forte abraço Renato Artesanato em MDF
I agree with everyone that this is a great idea, but my main concern is cost. How much did the project cost? I was told by someone that it would cost me around $50 which is kind of steep for me. Please, all who have made this, tell me how much does it really cost before I get excited about it. I live in a small apartment with a tiny kitchen and I have the space on the side of the fridge to definitely accomodate this pantry on wheels.
This is going to cost you at least $50 for the wood. I used whitewood which is a step above the lowest grade wood but it saved me A LOT of sanding. You Should get a better deal at a local owed store over a corporate store like Lowes or Home Depot. Then you need the castors (cheapest I found were $2.00 each one), drawer handle ($3-$5), and paint if you so desire. Also need screws and nails if you don’t have them already. It adds up fast.
Hi!
It cost around $100 to make after lumber, casters, dowels, paint, etc.
Thanks!
Mallory @ Classy Clutter
Hi, Mallory, I just found your amazing project on Pinterest! It’s so SUPER! I’m a blogger, too, and it gets discouraging when no one makes comments (I do tutorials sometimes, too), so I wanted to be sure to come find you in Blogland and tell you how great this is! Kudos to you for living with and loving your small space, too!
That is fantastic.. I think I know what a future project is gonna have to be!=)
I love this idea! I have a nice useless space next to my fridge this would be perfect for. I have read thru all the directions and all the comments. As such, I will definitely be measuring my space before purchasing supplies. I will also be using thin lattice strips, instead of dowels, on both sides to allow access from either side. I will also nail or glue a board ‘stop’ on the floor to prevent the unit from being completely pulled out. I may also put locking wheels on the front so that one can’t just walkover and yank it out. I will probably paint the exposed side with chalkboard paint to use as a Menu or shopping list. This project will be my “reward” for getting my house decluttered and organized this month. Thanks for the great idea!
What a great idea! Did you take any pictures? I’d love to see how yours turned out!
Deanna
this is just too cool. I want to make one and I will. I read the directions and I am bit confused about some of the parts, but I hope to figure it out.
i saw another person made one of these after seeing yours. she anchored it to the wall using a chain so that it couldn’t be pulled out far enough to tip. i also see that you have yours place between your fridge and wall for stability.
thanks for the awesome idea.
Deals in manufacturing and supplying supermarket shelf such as library shelf library book shelf, glass library shelf, book storage shelf, corrosion resistant book shelf and decorative book shelf.
For more details visit us:
http://www.unitechindia.org/
The one concern my husband has is regarding the casters. When it is pulled out all the way, are the casters enough to hold it without falling over to one side?
I made this cabinet soon after I saw it. I love it. It holds so much stuff. I really love that I can see all of my spices now. Thank you so much for sharing.
Love this space saver of an idea.
Instead of drilling the holes for dowel rods do you think using tension rods ( like for curtains) would work as well?
Wow Mallory, so many people are not only inspired but actually making this project, that rocks!
Amazing what you can fit into a small space isn’t it!
Really a great idea. I Plan to build it for my wife. Thanks so much for the insight.
What a great dea am surely copying your idea. Just bit of change actually I want a wooden wine rack so I ca do this too.
Thank you.
So, why 4 casters? Why not just 2?
thanks for the great idea. We adjusted the idea for our space and use a drawer slide to add stability and make it easier to pull out and only used two casters.
drawer slide…Great addition to an already cool project. Thanks for the idea 🙂
Coolest. Thing. Ever. I’ll be building this shortly for our tiny apartment kitchen. However, I may think of replace some of the top shelving with a place to hang a couple of pans, baking trays, and cooking utensils, as it would be directly next to my stove/oven.
This is wonderful Thanks for the construction post! Scaling down markedly and this is calling to me, for the kitchen, I’m sure!
This is wonderful Thanks for the construction post! Scaling down markedly and this is calling to me, for the kitchen, I’m sure!
Fantastic Suggestion – exactly to my taste.
In Europe they call these cabinets “Pharmacy Cabinets” because the pharmacists use deep pull out cabinets just like this to efficiently store all the itty bitty drugs and vials. Space is at a premium over there – HENCE why IKEA offers it.
I plan on building or buying one FLOOR TO CIELING with two 12 inch pullouts.
It will have a left and right wall and a top. . . for TRACKS to guide and glide.
Caster on floor is good, but interested in comments and thoughts on using DRAWER GLIDES, left and right every two feet of the height. (inset at shelf level?)
Any more thoughts on size limitations for this sort of pantry?
Gene in Nashville
better ask a pro, I’m guessing two lefts or two rights. I’ll be calling my supplier tomorrow I had the same question
Answered my own question. If using furniture glides that you tip a drawer up a little to insert , using the opposite glide upside down would require you to tip it DOWN at the same time. NO GO. They do make ones that are not L or R..
If you have a wood floor an under glide could be put underneath. Be sure to weigh what will go on the glide, drawer and contents then buy the appropriate one. The ones I found are only 3/4 extension, leaving about 8″ of the drawer between the wall and the fridge. just fine for oven racks and cookie sheets and spaghetti. 🙂 I don’t know you you would get the drawer out if you had an exploding tomato can.
Absolutely beautiful!!! Just pinned this and put it on my husbands to-do-list! So creative with the chevron on the back!
Girl I have seen this floating around Pinterest for sure. I actually ran to my fridge to see if it would work in my space too. Fabulous!
I loved every bit of this, I wish I had skills like this. My dad used to build cabinets and I could never figure it out. I would love to get more experience with it. I’ve been looking around and have heard of these cabinets in Halifax that I would probably really enjoy trying out. I guess we’ll see how it goes. So fun!
I love this, its just what I’ve been looking for. My husband and I just moved into this new home and we are short on space right now. We’ve got a lot of stuff and its been hard trying to find some extra storage in Edmonton. Looks like I’m going to have to be creative. I guess we’ll see how it all goes, wish us luck!
Thank you so very much for sharing this project in concise detail and inspiring my boyfriend and I to [finally] solve our kitchen dilema! We figured out the schematics for what will fit in between our fridge/wall, purchased the materials, and prepared all but one aspect. I’ve read through your wonderfully clear instructions and the comments posted above; however, I am left with just one question I am hoping you could answer:
Someone above brought up the “swivel” vs “fixed” casters contention, but I did not see a response in favor of one or the other. Since you have the swivel one in practice, is there a reason why we would want to use the swivel casters and not the fixed ones?
Thank you again!
wish we could buy these pre-made! This looks fairly easy, but I’m not sure I have the patience and skill.
This looks so fantastic! We have a similar gap in between our fridge and wall and I shove our cookie sheets, muffin tins, and cooling racks in there because it’s convenient but it looks horrible. I was searching for some sort of pull out organizer for them when I found this… I LOVE IT! I’ll just do two shelves and move the dowels up a few inches to allow cookie sheets to be slid in. I hope it works like I think it will, haha, thank you for the tutorial!
How much did the whole project cost? I have the perfect place next to my fridge and could use a place to store my can goods and seasonings. Thanks for a great idea.
I love this idea I’m going to get everything I need for it today. It’s perfect for the spot by my refrigerator. I have 2 sisters wanting one now. I guess we can make them all at once. Thank you for sharing.
Something like this plan would be a great thing to use as a front facing book shelf for kids. OF course, not on coasters, and affixed to a wall, but a great option for little readers. I feel other ideas coming on as well. Thanks for the inspiration.
we just built ours ,came out pretty neat ,thanks for sharing
would love some tutorials for walk in closet too !
I’ve seen this before, but you’re the first one I saw that posted building plans.
I wish someone manufactured these pre-built, but the problem comes is that it can tip over and the company can get sued? So, why not install a closet track on the top.. similar to how a closet door is on a track when it slides open. This will keep it from pulling out all the way.
My bf and I made one this past weekend and it turned out awesome! Showed the pic to three people and they all want me to make one! :-D:-D
I am a do it your self guy, I have built and mad many things over the years, and I do it the same way, just from my head, I don’t have any design plans, other then a drawing I did to go by if I nee it, if you need any tips, I would gladly give what I can.
If you belong to face book, you can look me up and I have an album of things I built over the years. find me under Jay Mac it’s a picture of a blue “2013” here is the link directly to my album:
https://www.facebook.com/Smiley1958/media_set?set=a.2424442070569.89659.1837024272&type=3
I love this!!! I can’t wait to make it. My daughter will be so jealous, cause she doesn’t have the space beside her fridge!!! lol
I love, love, love this! What a great way to maximize space in a small kitchen. Pinning this now! I’m stopping by from Link Party Palooza (#142 First Day of School Photo Tutorial) Have a wonderful weekend!
Such a great idea you shared with us ,this idea will help me to save a lot of space and it is also looking too good .Thanks for Sharing .
Genius!
The hubby made me one, only he used 1 x 6 boards and used peg board for the back I use small baskets to put small items in like gravy mixes. I love it.
These are great ideas for self storage. I am going to try this!
n ice postt loved it
This would be the perfect solution for my super tiny kitchen that lacks storage and a pantry. I need to make this.
My husband and I built this and found that with the 1×4 after we added the dowels we BARELY had room for a small spice can on the shelf. In the picture I see what appears to be regular sized cans. My husband is a very experienced “DIYer”, very sure he didn’t goof up on the measurements. So he simply added 1×1 around the back of the shelf, then added the back piece. Worked fine. Built one for our daughter and used 1×6 to start with and turned out perfect. Just a word of caution.
I just built this. Today. In three hours. The design is perfect. I used 1×6’s instead to give it a bit more depth, but changed nothing else. I’m going to add a drawer rail in the back to keep it in place and to prevent rolling it out too far. Thanks for the awesome design!
if you don’t want to put can goods in it, I think using the space for brooms or dustpans, things like that would work as well. just another idea.
A couple of questions come up about rubbing the walls or fridge, heat and stability. Most hardware stores sell silicone bumpers with adhesive backing. Buy some that are 1/2 inch in diameter and attach to the wall and refrigerator. These will provide protection. As for stability, there are a couple of thoughts. Drawer slides have been suggested and are good if the other half can be mounted on a wall or upper cabinet. If its not possible, then wider is more stable. 6 inches would be better plus keep all heavy items at the bottom. As for heat, use 2 sheets for the backing and sandwich 1/4 inch styrofoam in the middle. You could also use foam sheeting used for packaging. Its really thin. If appearance is not an issue, then just put the styrofoam on the inside before the shelves go in. An observation is that rotating casters are shown. I think fixed casters would be better as there can be some wiggle when the casters rotate. Great idea
I have been mulling this idea around in my head for a couple of years. Nice to see someone has actually made one. I have a larger space so I plan to do two. I also will make the more stable so they can roll out on their own and not need the support of the wall or frig. Thanks for all of the tips on this one. I’ll definintely be able to use all of that info and adapt it to what I want to make.
Hi Mallory,
We are writing an article, and wanted to highlight your tutorial. We are an emergency preparedness store (beprepared.com) and think this is a great concept for emergency food storage. We’d like to get permission from you to use the picture of your shelf for our weekly email and blog post. We are of course, linking back to your page and giving you full credit for the tutorial. Please email us and let us know.
I made something similar but it is a vertical can rotation rack with a space for water bottles underneath. Mine does not roll, and I glued extra strong magnets on the back to attach to my fridge. It holds 44 cans and 27 water bottles. It appears very sturdy even when I shook it like an earthquake would. I haven’t painted it yet, but am very happy with it. Of course if the “Big one” hits, it more than likely would fall down, but there is a wall that it would lean against and not fall completely to the floor.
I love this idea and I really need one of these. I’ve been studying your plans and I did not see how much space you allowed between shelves. Could you share that info with me?
Thanks so much!
This is seriously brilliant! LOVE!
Couple tips:
My handyman put this together for me. Took him 4 hours at $20/hour. Materials: $96 (I used pine). SOOO worth it!
I had less space to work with so my shelves are only 4″ deep.
I made one 13″ shelf, one 11″ shelf, and the rest 6″. It can get heavy quick if you put big heavy things in it (glass bottles, big cans). I use mine mostly for lightweight things that take up a lot of space: pasta, cake mix, Campbell’s soup cans, cookie decorations, spices.
We nailed a thin strip of wood to the wall about 1′ down from the top of the shelf, to give the pantry something to roll against as you pull it out to stabilize it. Oh, and if you are making the shelves less than 6″ deep, make sure the casters you buy will fit next to each other at each end. Mine were too wide, so we used 3 casters in a row and staggered them slightly, again for more stability.
A super-cool pantry! I love it!
I have been trying to describe this type of thing to a friend of mine who thought I was quite nuts trying to fit something into a space so small. I knew exactly what I wanted and now can actually SHOW him what I mean. Thanjks so much for this
it is fantastic. Saw a similar thing put in between a washing machine and a drying that worked well too.
My husband and I designed one of these about 5 years ago. Instead of using wheels we used heavy duty drawer slides, top and bottom. Also instead of dowels, we used metal stainless 1inch wide strips. The strips take up less room since they are only about 1/8 inch thick. I would think without some sort of guide to slide out it would destroy the side of your refrigerator over time. Also we used 1/8 inch plywood for the back. By doing this project we were able to use a 4 1/2 inch space between cabinet and refrigerator.
This is an awesome project! I’ve been eyeballing it since I saw it on pinterest months ago; we fit 6 people into our 900 sq ft house, so every inch has to count. Mine will be a “broom closet” rather than can storage, and I’m doing a pegboard on the back to hang the dust pan and whatnot. Thank you for sharing this!
My recommendation would be to add a rail to the wall just above the back of the organizer and a roller on the top of the organizer near the back that rolls on the rail. I’m thinking of the kind of rail and roller used for sliding doors. Especially the nicer-looking barn door style of doors that have become popular in homes lately. The rail and roller would give the organizer stability and also serve as a stop to keep it from rolling all the way out onto the floor.
Also, depending on one’s needs, fixed wheels would be better on the bottom of the cabinet rather than swivel casters. The organizer only needs to roll on one axis. Fixed wheels would keep it on that axis. That would also make this organizer safer and easier to handle, especially when it’s loaded down with many items.
Overall, this is a good prototype, though.
yes, fixed rollers would be better – also maybe if the rear ones could run in a track screwed to the floor so that it slides in and out without moving left to right?
my cabinet that my husband built wasnt going to be used between a refrigerator, but a wall and another cabinet. so i found drawer slides online that were 28″ with full extension PLUS!! our cabinet was 26″ and the space we had to use was 30″ so we mounted the slide all the way to the BACK 30″ forward 28″ and the cabinet itself was attatched to those drawer slides and resting it is in a semi OPEN position. it does stay stationary…the front look the cabinet is flush with the side cabinet it matches. since the drawer slide opens 28″ PLUS full extension the 26″ cabinet pulls completely out where the back of my new cabinet is fully accessible. and the cabinet can be pushed IN an extra 2″ to reveal a exterior light switch…and hidden when i dont need it 99.9% of the time (since we have deck lights on the posts of the deck. ) it is sturdy! no tilting, its so easy to pull it out, push it back in…so scraping of the wood. i painted it to match the glazing on my cabinets. you’d never know i didnt purchase this from the cabinet maker! picture in comments below.
I put a 1″x 6″ by 32L and attached a set of appliance rollers, my unit is now standing freely and rolles great.
very inspire , love this article
I just picked a one word goal for the New Year and mine was unclutter. I realized I need to start with the basement of my house and I am posting my journey on my blog. I have a small kitchen (actually house, it isn’t even 900 sq. ft) so every inch I can use is meaningful. I have been having a huge problem on where to put my spices. I don’t want them taking up valuable cabinet space since I have so few and there is no room on a wall for a traditional spice rack (kitchen area has the cabinets and the only wall has the table against it so it is not usable for a spice rack). Finally a perfect solution to my problems!!!! I do have at least 6″ between my cabinet and refrigerator and this is perfect. I can reconfigure the shelves for spices. I am so excited I found you (on FB someone sent it to me). Thanks for putting the DIY instructions too. I am so excited now!
I think this is a great idea, and just what I have been looking for, but I am going to modify it to use for broom, mop, dustpan, trashbags, etc. THANKS
http://www.pinterest.com/pin/426012445976841546/
Thanks so much for the great idea! This is my finished project that my husband and I made for a 6″ space behind my kitchen cabinets. It holds so much!! its 82″H x 26″depth and just under 4″ wide. I painted a french script and eiffel tower postal code in the back of the cabinet. we used drawer glides to stabelize it and stationary wheels to pull it out with.
what a great idea. We are going to do this at our shop.
I just finished the slim food pantry , however I added a 1″ x 6″ to the bottom and used a set of appliance roolers,
It is very sterdy now, rolles well , stands by it self , however still use caution.
Found this on Pinterest and really like the idea. Might incorporate it into our plans when we get around to remodeling kitchen.
The only thing hanging me up in this whole article is Where are you finding 5 lbs of honey for $5?? LOL
Beckey
http://reallyreallyrealhousewives.blogspot.com
http://www.etsy.com/shop/queenbsbusywork
I have to tell you – I did it! I built one. Well, first I built a proto-type (doesn’t that sound much better than saying I made some mistakes the first time). When I wasn’t satisfied with it, I took the casters off it and nailed it up in my basement for storage.
Then I started again. I trimmed your version by 2″ (my side wall is not as deep as yours), and in 6 hours (3 hours assembly, 1 hour painting, 2 hours drying) I had a bee-yoo-ti-ful pantry!
Thank you so much for the inspiration and the instructions!
Elaine from Canada
great idea…thanks for sharing
Sorry if this is a dumb question. You have a 6 inch opening I see. But it appears your pantry you made is extremely snug in your space between the wall and refrigerator. I so want to make this (even smaller kitchen than yours), but I only have 4 1/2 inches between my fridge and wall. Do you think I could still pull this off using the 1 x 4s?
Thanks!
My kitchen is so tiny, *so* tiny… I would have to do a recessed handle to keep from injuring my arm/ shoulder on the pull when I pass by it! Very lovely idea, and excellent execution!
Also– note: this is NOT a good idea if you have a kerosene, LP, or natural gas powered fridge! You could compromise ventilation and also spoil your food, as it would heat up considerably!
I really like this idea. I am redoing my kitchen and will have a smaller fridge than before, so I will have some unused space beside it. I am going to build this to hold my baking pans and muffin tins which are rarely used and take up so much space in my cabinets. The pans should be lighter weight than your canned goods so tipping shouldn’t be as much of a problem. Thanks for sharing a great idea!
great idea, but I was wondering, wouldn’t this scratch the side of the fridge going in and out all the time?
It never scratched my fridge but I did leave a little room between the sliding organizer and my fridge! Hope that helps!Thanks for stopping by!
Did this many years ago, but made it with a 1×6. That way, was able to hang a mop, broom, dustpan and anything else on the flat surface side. Perfect solution for a tiny studio.
Hi,
That looks good, we’ve got a similar gap in our kitchen which could be used for this, freeing up space in the cupboards.
Since you completed the project, have you had any problems with the shelves bowing because of the weight of the cans and how full do you load the shelves? I was thinking of putting an addition piece of 4×1 in the middle at the back and angle brackets to give extra support.
Rgds
Edward
Mine has never had problem with the support, but yes that would be an excellent idea!
I know it’s been the years since you payed this, but I stumbled on it and I just wanted to say “thank you so much!” for making such a comprehensive, easy to follow directive pay about this! I have seen these in magazine articles etc, and have never seen instructions! I’m so excited to finally be able to do this as we have limited storage in our kitchen and an entire cabinet is taken up by canned goods and spices etc! So ty again!
very useful article, thank you! buy-instagram-followers
In my kitchen the space between the refrigerator and the wall is 3″. Would that work?
That probably won’t work. You need at least 6-8 inches.
Take off your list I am getting mad. Take off your list or I am going to report you.
I am sorry, we are not really sure what list you are talking about but maybe you subscribed to our email subscription at some point. Just go to the email and unsubscribe.
Did you drill the holes for the dowels all the way through or blind?
This is a great idea. I modified it to make a “broom closet” and it is working beautifully! Thank you
Glad it could work for you! Hope you are enjoying it! Thanks for stopping by!
This was a great idea. Thank you. I am bookmarking this blog 😀
If you put a sml. board at the end where you want to stop on the end of your pull out & a rubber stopper on the wall that would take care of the stopping ~~~ Or I would think so anyway ~~~
I am building this and for some reason 2 boards are short then the rest. They where all cut a home DepotDepot what can I do so Lil gap doesn’t look bad..
This is such a beautiful idea! I love the chevron background.
Could you build it with just shelves and dowels. You could reach from either side ?
I’ve seen one online that was done this way. Search for refrigerator pull out shelf and you should be able to find it.
I built one of these many years ago and add a guide on the top so it would not wobble back and forth. It was a 1×1 attached to the top of the mobile unit in the middle. Then on the wall I attached a 4 X 1 that ran the length of the mobile unit with a 4 X 1 at the bottom to rest on top of the 1 X 1. I then attached a 1 X 1 on either side of the 1 X 1 to the 4 X 1 so it could slide through the middle of it.
I just made my own! Thank you for the idea, it worked beautifully in my new studio!
I’m going to make this very soon, but I was thinking about using peg board for the top half of the backing instead. That way I can hang up my measuring cups and spoons, and packages above the shorter cans. No wasted space!
Thanks for the awesome idea and instructions!
I am a carpenter/ cabinet maker and for those of you who are concerned with the cabinet tipping over I would suggest mounting a drawer slide on the back side of the cabinet between the wall and cabinet. The drawer slide will solve two problems. It will limit the travel of the cabinet so that it won’t completely come out past the wall and it’ll prevent the cabinet from tipping over. If you’re handy you could mount the whole thing on drawer slides if you use a back panel at least 1/2 inch thick. The slides would need to be an over travel design to allow the cabinet to be pulled out far enough. I hope this helps some of you out there!
How can you stop it from scratching the frig?
Please add me to your mailing list. Thank you for sharing this wonderful evening idea! I can’t wait to get started
you should make it clear to use 1×4 lumber. a store bought 1×4 is only 31/2 inch, not wide enough for can and dowel.
This is awesome article and I found it very helpful.
I just built this! Thank you so much! We have a small kitchen with no pantry in a three bedroom apartment for 4 adults. Terrible design, but it is what it is. We are painting it nerdy style, but it’s the same age as yours. Thank you so much!!
A simple solution to the cabinet coming out to far is simple. Install a toggle anchor on the back wall 3″-4″ above the shelving unit. Then screw in a machine thread eyebolt into the anchor. Then screw an eye screw to the top of the shelf directly in the middle. Run a small piece of 1/16 rope from eyebolt to eyebolt long enough so the shelf stops 6″ short of all the way out.
I absolutely love it!!! ❤❤??☺ . Now if someone had 2 openings on both sides of their fridge, where they are able to put another one on the other side of their fridge that would be even more convenient for a small kitchen. Now that would be pretty cool and convenient and right there when you need something.
cool post
Hello Mallory,
I have made a surprise to my wife with your decoration by following your guide 🙂 She was really impressed.
Thanks for all 😀
Thank you for this awesome idea. I really like the zigzag you put on the back panel.
Thank you for sharing this amazing post. It helps me a lot.
This is really impressive post, Thanks keep it up.
If you make this with only two casters and you fully load up with canned goods you can exceed the weight limit of two 50 lb. casters. Get stronger casters or use 4 like in the diagram, All in tandem. Canned good can exceed 100 pounds, and then there is the wood.
This is an awesome article and I found it very helpful.
thanks for sharing this post, worth reading.
Hello, your post provides very good information. Information within the comment is excellent.
Your blog provides a useful and quality information and your information within the comment is awesome.
Hi, you are providing very useful information. Keep on doing such kind of research. Appraising work was done by you.
Sharing best article is not easy for every writer, But a professional writer can easily, yes you are also a best writer, Thanks for this
thank you
I stumbled upon your post and it was a lifesaver. I have plenty of room for canned goods but no decent place for my brooms, etc and cleaning supplies except in the garage, which isn’t really that convenient. With some minor modifications, I was able to make broom closet/cleaning supplies organizer. I will happily share photos but not sure how to post them on my comment.
Nice article
Thanks for sharing!
Thanks for post
Thanks for post
Thanks.
Good job, keep it up
Very nice post. I just stumbled upon your blog and wanted to say that I have really enjoyed browsing your blog posts. After all I’ll be subscribing to your rss feed and I hope you write again soon!
Thanks for post
always used to study post in news papers but now as I am a user of net thus
from now I am using net for content, thanks to web.
Great article. I love to share this one.
appreciate the quality of content being published here!!
good job and I like it. great post and it is very beneficial.
Very nice post. I just stumbled upon your blog and wanted to say that I have really enjoyed browsing your blog posts. After all I’ll be subscribing to your rss feed and I hope you write again soon!
Thanks for post
The canned food organizer is a great idea. Smaller versions of the same thing can be used for spice racks. Appliance garages are also a space saving idea.
Nice site.
Great Idea!! Has anyone tried using dowels on both sides instead of the wood backing? Does it need the back to achieve the stability it needs?
It definitely needs it for support unless you build the frame a different way.
Thanks for your nice post really this post is very helpful .Please keep it up your writing .
I am waiting for your new post
thanks
It’s totally tiny but does a fine job suiting our needs…mostly… One problem I’ve run into with a small space is storage space. I’ve had to get a little creative and maximize the empty space hiding in the room since we’re lacking a pantry. However, our kitchen had about a 6″ opening between our wall and the refrigerator.
I love this an plan to make one. One concern I have is moving it out for cleaning. I have 3 dogs and you can image the dog hair. If it’s not free standing, any ideas on how to clean under it? Or, do you think if I’m careful and don’t put heavy things on top, it will be OK for the few minutes it will be out of its supported space?
Wow! That’s really a nice idea! I was in a crying need of such a food organizer for my family. Hope I got it and will do perfectly like yours! On the way to start making! 🙂
What an awesome idea. Please add me to your mailing list.
At this time I am going awy to do my breakfast, afterward having my breakfast coming again to
read other news.
This is great. I was able to do something similar in my laundry room. Absolutely love it. -Joe
awesome! Thanks Joe!
Wow, this is great! My kitchen is very small and this would definitely come in handy since storage space in my pantry is small too, thanks for sharing!
I have a space where my old frig use to be my new frig is to big for could I have several of these in one spot and maybe be double sided I no storage and nowhere for my can and box food also maybe more shelves for spices ?
The thing is, your idea is not bad but in my country, the weather is very hot and I cannot put stuff like that right beside the fridge. Can you help me with and give something that I can use to set things right??
Tubemate for PC is an app which allows you to watch and download YouTube videos.
here you can download and install free Tubemate For PC (Windows 10, 8, 7 & Mac)
Love this rolling pantry. How did you decide on the spacing for your shelves? We have some tall bottles, large bottles of olive oil etc. Then want to store regular size jars, 16 & 36 ounce Ball hard and cans etc.
First of all, this idea is genius. I love how this super creative project gave additional “spunk” to your kitchen. 🙂 Second, this is a great idea for anyone who wants to save space or organize. :). Thanks for sharing – bookmarking this post right now 🙂